I know you’re eager to upgrade to Windows 11, but please read the precautions (below) before you start.
How to bypass windows 11 cpu & TPM requirements
Option 1: Use MediaCreationTool.bat to install Windows 11 completely automatic
On many (older) PC’s and laptops, Microsoft’s own registry modifications to bypass the TPM/CPU checks simply won’t work.
Luckily I found MediaCreationTool.bat. I used this tool on an ancient laptop and it worked like a charm. This is -by far- the easiest way to upgrade to Windows 11.
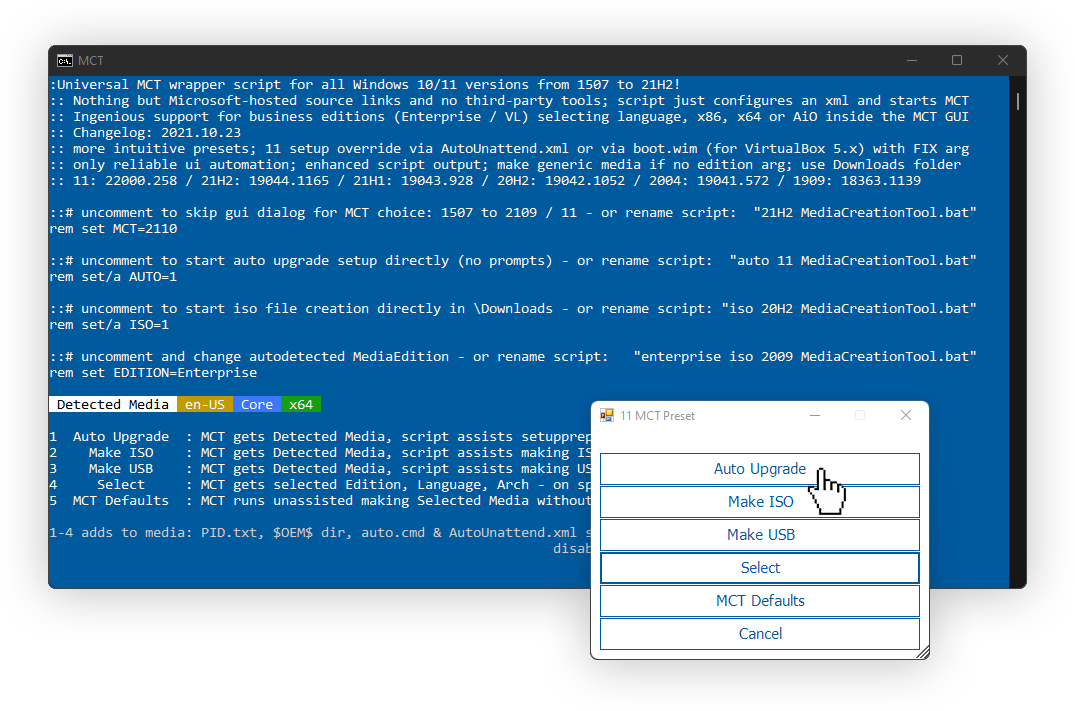
- Download MediaCreationTool.bat, either via Github (or my mirror.)
- Unzip it and run MediaCreationTool.bat and give it a few seconds until it shows a pop-up.
- Now Select (Windows) “11” and in the next prompt, select “Auto Upgrade”

That’s it! All you need to do next is wait for the automated download and installation to complete. This worked perfectly on a Second(!) Gen Intel Core i3.
You get to keep all your files, apps and settings.
Option 2: manipulate the Windows 11 installation media
The only thing you’ll need for this trick is an empty 8GB (or larger) USB stick.
- Go to the Download Windows 11 page and download the Create Installation Media tool
- Allow the tool to download the installation and create the bootable USB stick and wait for it to complete
- Now copy all content from the USB stick to a new directory on your computer and unplug the usb-drive as you won’t need it anymore.
- In this copied windows 11 installer directory, open the ‘sources’ directory and delete the file “appraiserres.dll”
- Now you can go back to the main directory and install windows 11 with setup.exe
You can’t just upgrade your current Windows 10 installation without losing your installed software with this method.
You’ll only be able to do either do a completely clean install or a clean install while keeping your personal files and settings.
So Yes, you’ll HAVE to reinstall most of your personal software and you might lose some personal data. So make sure you are prepared for this and take back-ups of the necessary files and software.
Option 3: install Windows 11 from a bootable USB and bypass “This PC Can’t Run Windows 11” screen
This can be handy if the PC you’re using can’t boot, or has no active Windows installation at all. Upgrading is easy, but beware when you choose to do a clean install: you will eventually need to (re)activate Windows after installation. Don’t worry if you don’t have a license key at hand though, as you can skip entering your licensing key during installation and start using W11 without activation. (I tried this with W11 Pro)
- Go to the Download Windows 11 page and download the Create Installation Media tool
- Allow the tool to download the installation and create the bootable USB stick and wait for it to complete
- Now, the actual installation:
I found an excellent video tutorial. You can watch it here, or just follow the steps here- Boot from the USB drive and follow the instructions until you hit the “This PC Can’t Run Windows 11” screen:

- Boot from the USB drive and follow the instructions until you hit the “This PC Can’t Run Windows 11” screen:

- Click the back-button (top left)
- Press: Shift+F10. This will open a command prompt
- type regedit and press enter
- Navigate to HKEY_LOCAL_MACHINE\SYSTEM\Setup and right-click the ‘Setup’ directory on your left
- Choose ‘New’ –> ‘Key’ and it will create a new directory. Rename this directory to LabConfig and open it (you’ll be in HKEY_LOCAL_MACHINE\SYSTEM\Setup\LabConfig)
- Right-Click in the big empty white space inside the directory and select New –> DWORD (32-bit Value)
Rename it BypassTPMCheck and press enter. Double-click it and change the value data from 0 to 1 and click ok. - (again) Right-Click in the big empty white space inside the directory and select New –> DWORD (32-bit Value)
Rename it BypassSecureBootCheck and press enter. Double-click it and change the value data from 0 to 1 and click ok. - (again) Right-Click in the big empty white space inside the directory and select New –> DWORD (32-bit Value)
Rename it BypassRAMCheck and press enter. Double-click it and change the value data from 0 to 1 and click ok.
- Right-Click in the big empty white space inside the directory and select New –> DWORD (32-bit Value)
- Now you can either upgrade to or clean-install Windows 11
Recently I received a (really) old laptop without a drive (for security reasons). So I just installed a fresh SSD and did a completely clean Windows 11 Pro installation like this. It works like a charm, but I still had to activate the Windows 11 installation after.
Precautions: keep these things in mind
- Neither Microsoft nor I can guarantee a perfect experience with Windows 11 on ‘incompatible hardware’ or a system that doesn’t meet the requirements. Neither Microsoft or I will take any responsibility for crashes or any other inconveniences.
- I’ve used these methods and done successful updates via option #2 on October 5th 2021 (release day) and option #1 on November 6th. But you never know, perhaps Microsoft has already changed a thing or two, which might render these bypasses obsolete…
- I don’t know yet whether or not Microsoft will properly update these ‘incompatible’ installations. I assume they will at best effort though.
UPDATE DECEMBER 2022: Yes, you will receive updates, but you will NOT receive major feature updates, which are basically new Windows installations. But no worries, you can bypass this inconvenience too. Here’s how to install or upgrade to the latest 22H2 upgrade on an unsupported device. - It’s never a bad idea to back-up your Windows 10 or Windows 11 Product Key / License Key first before you start tinkering with your OS install…
This article was written on a perfectly running windows 11 installation on an ‘incompatible’ Intel Core i7-6700 CPU, and yes: it works flawlessly.
I’d be happy to hear from you in the comments whether or not the upgrade was(n’t) a success.
Ps. After the upgrade is complete, don’t forget to optimize your security by changing your DNS settings.


1 thought on “Windows 11 upgrade: easily bypass the requirements & incompatibility for old PC’s”
Love your articles! Thanks a lot man 👌